

Guides
Livestreaming services are available with Enterprise subscriptions.
Options available for creating a video asset from a livestream
- Auto Record
- Live clippings
-
- Recording method
- Recording window
- Availability
- Video trimming
- Recording window max length
- Recording source retention
-
- Auto Record
- Uses livestream start and stop
- Post broadcast
- No
- 36 Hours
- Not applicable
-
- Live Clippings
- Records everything broadcasted
- During and post broadcast
- Yes
- 36 Hours
- 14 Days
Auto record
Auto record is configured per livestream. It can be enabled when you create the livestream or enabled from the livestreams view with the option Record this livestream.
Since recordings are limited to 36 hours, the option will only be available on livestreams that are scheduled for 36 hours or less.
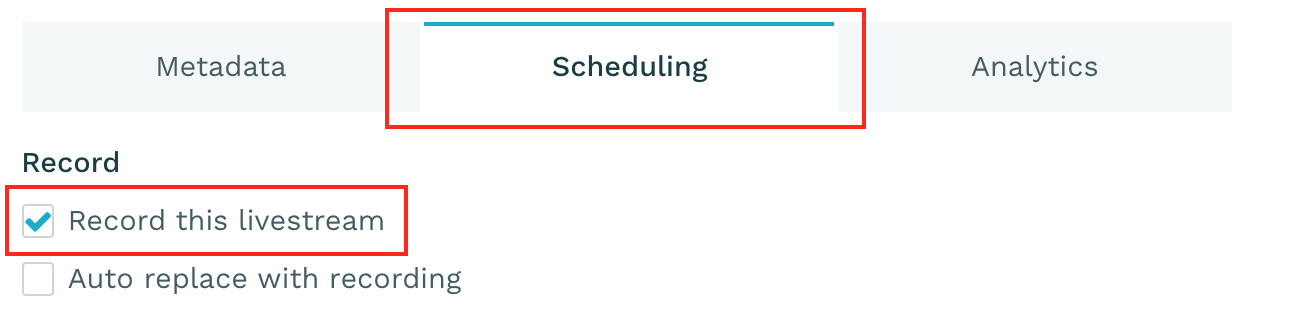
It is possible to toggle auto record on an active livestream but it is not recommended as it may have unintended consequences, particularly when used together with the Auto replace with recording option. It is generally safe to turn ON auto record on an active livestream and then leave it activated for the duration of the livestream.
When enabled, everything that is published from your encoder between the start and stop time of the stream will be recorded.
Video assets created by the auto record feature will show up in your video listing as soon as they are ready.
Assets created by the auto record feature will also have an association with the livestream and be listed under the Replace with video section of the livestream.
Live clipping
Everything you publish on all streaming assets will be available as a recording, with a max length of 36 hours. Livestreams running longer than 36h will not have this feature, if you need live clipping for your 24/7 streams please contact support to discuss your options.
Live clipping allows you to create video assets from an ongoing livestream on the fly or from completed livestreams. The live recording is available for two weeks before it is automatically removed.
Creating clips from live recording
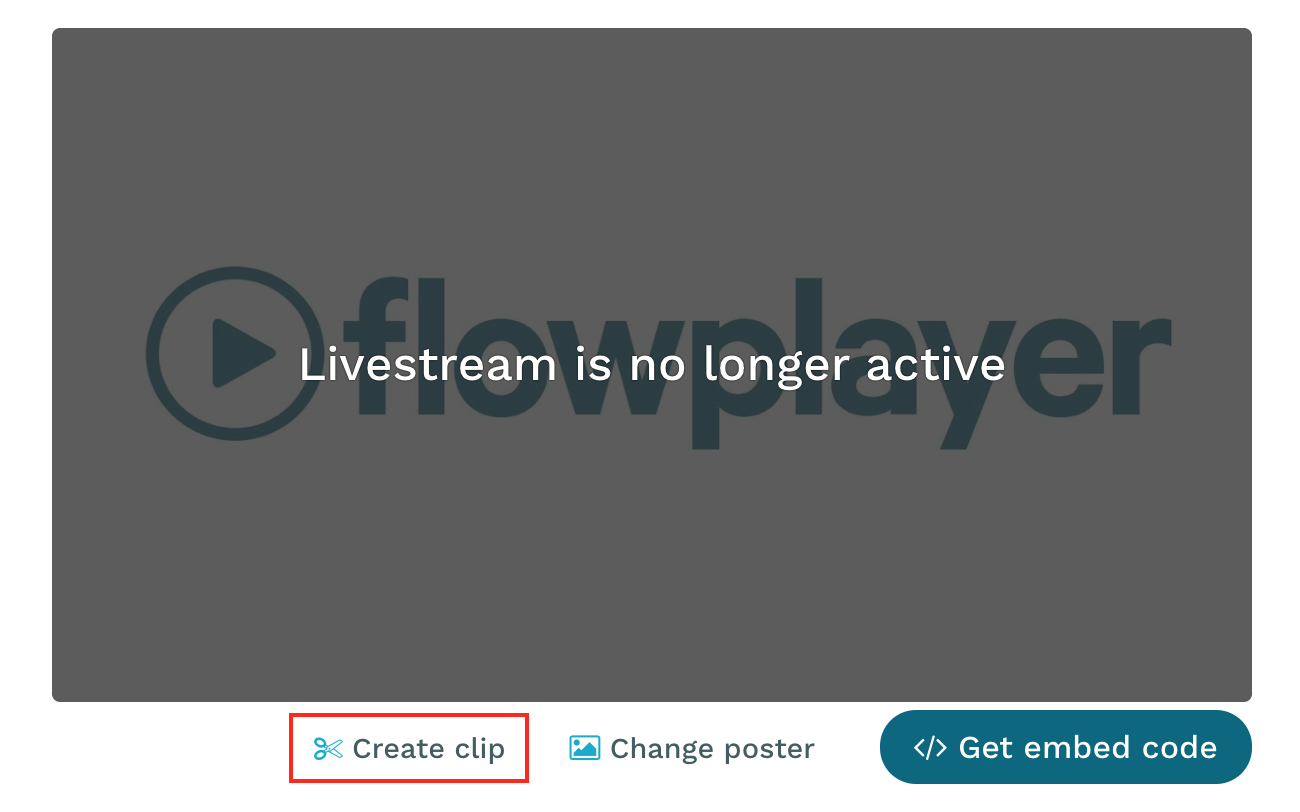
To start creating clips from the live recording, simply click the "Create clip" link below the player in the livestream view to open the editor.
The editor has the following components:
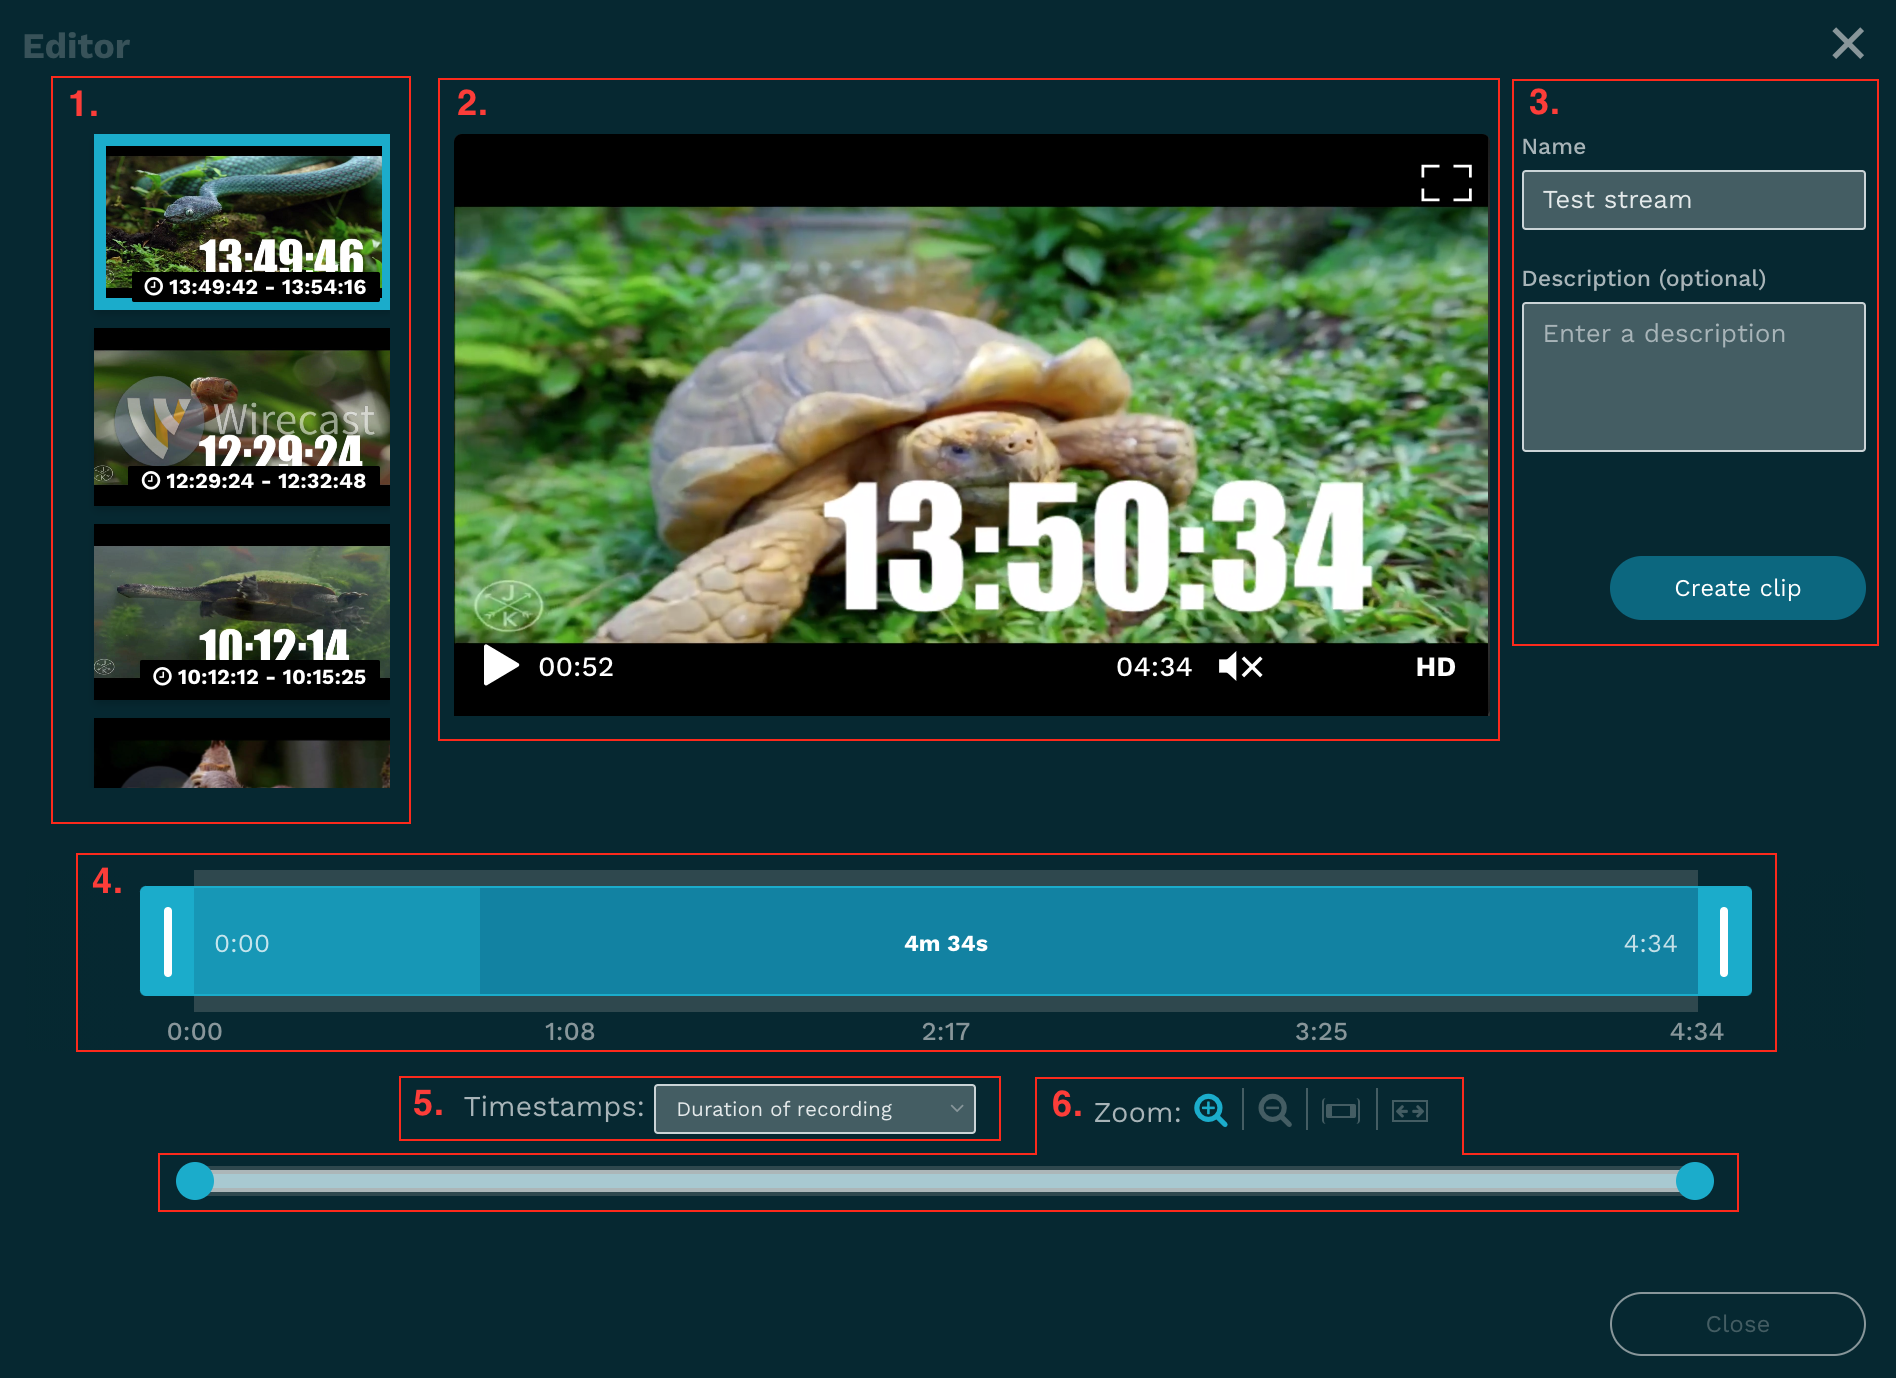
- List of recordings
- Clip preview player
- Form for naming and finalizing the clip
- Clipping tool
- Timestamp type selection
- Zoom and focus controls for the clipping tool
The number of available recordings depend on how often recording was stopped and restarted during the duration of the livestream. Typically, there will only be a single recording covering the entire broadcast as long as there was a single uninterrupted source stream during the livestream.
To create a clip, first select a recording.
The clipping tool shows the timeline of the recording. Using the timestamp type selection you can choose if you want to see timestamps as the elapsed time within the recording or the actual time of its recording.
To set the region of the recording you want to create your clip from, drag the handle on the left of the clipping tool to set the beginning point of the clip and the handle on the right to set the end point.

You can also set the beginning and end points of the clip by using the preview player to find a specific point in the recording and then pressing Alt + I to set that point as beginning point or Alt + O to set it as end point.
It's also possible to set the points by manually editing their timestamps.
In order to be able to use the clipping tool with more precision, which is really helpful for longer recordings, you can zoom in on the timeline and focus on parts of it.
Using the zoom action buttons, you can zoom in on the timeline (1), zoom out on the timeline (2), zoom and focus on the currently set clip region (3) and zoom out completely to show the full timeline (4).
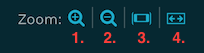
Below the controls, you see a bar that represents the currently visible part of the timeline. Using the handles, you can resize this bar which consequently zooms in and out on the corresponding part of the timeline. You can also drag this bar around to focus on the corresponding part of the timeline.
While moving the bar left and right with your pointer to change the focus of the timeline, you can simultaneously move your pointer up to zoom in or down to zoom out
When you are happy with your selected beginning and end points, give your clip a name and description (optional) and click Create clip. The created clip will be listed in the Videos view as soon as it's ready. It will also have an association with the livestream it was created from, meaning it will be listed under Replace with video on that livestream.
Keyboard shortcuts
Using keyboard shortcuts is a great way to work efficiently with the live clipping tool. Here's a list of the available shortcuts in the editor:
Alt + I: Set the beginning clip point at the current preview playback pointAlt + O: Set the end clip point at the current preview playback pointI + Click (on the timeline): Set the beginning clip point at the point clicked on the timelineO + Click: Set the end clip point at the point clicked on the timelineDouble-click (on the timeline but outside the clip region): Set the closest clip point (beginning or end) at the clicked pointClick (within the clip region): Move preview playback pointSpace: Toggle preview playbackLeft-arrow: Step preview playback point back one segmentRight-arrow: Step preview playback point forward one segmentShift + Left-arrow: Step preview playback point back ten segmentsShift + Right-arrow: Step preview playback point forward ten segmentsCmd/Ctrl + Left-arrow: Move preview playback point to beginning clip pointCmd/Ctrl + Right-arrow: Move preview playback point to end clip pointAlt + Click (on the timeline): Zoom inAlt + Shift + Click: Zoom outAlt + Z: Zoom inAlt + Shift + Z: Zoom outAlt + S: Zoom and focus on the currently set clip regionAlt + A: Zoom out completely to show the full timeline
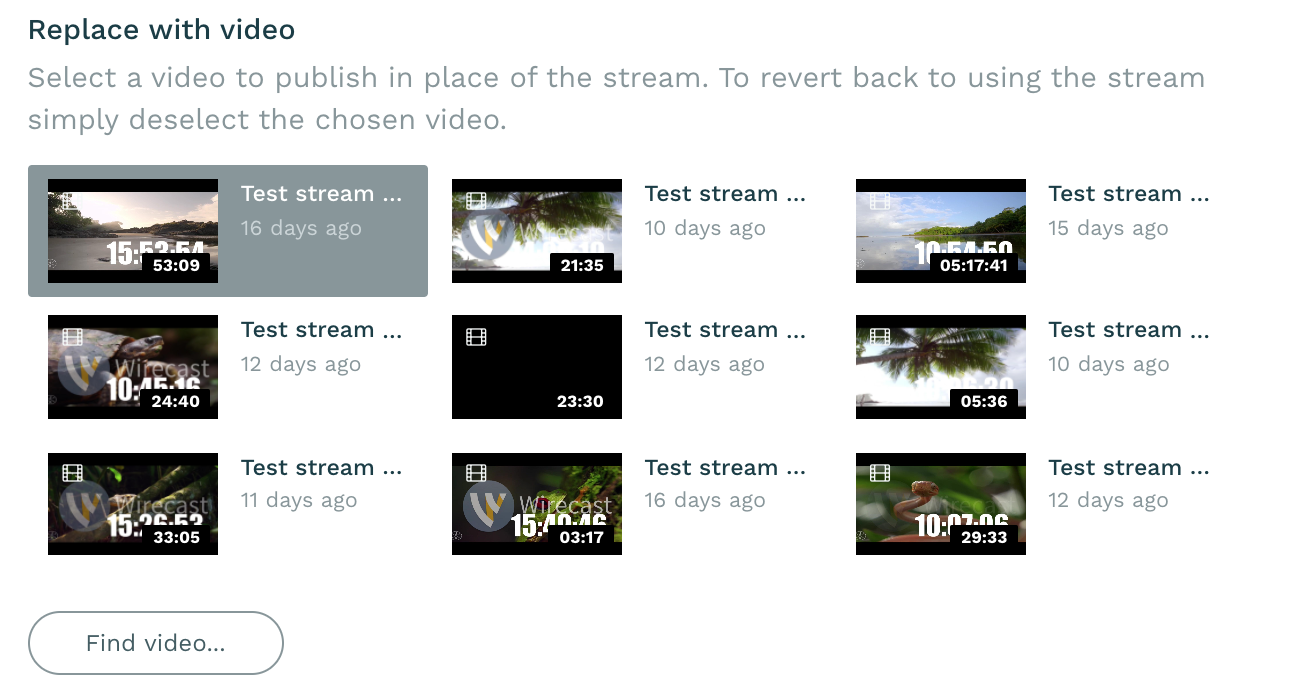
Replacing a livestream with a video
If you chose a video to replace the livestream with, your viewers will see that video instead of the stream, regardless of weather the selected live source has any input or not.
This is a very useful feature that lets your viewers watch a replay of the livestream after the event took place but you can also select any video from your workspace, including videos that have no association with the livestream, by clicking Find video....
If you have enabled auto record on a livestream, you can also have the livestream be replaced by that recording automatically by enabling the Auto replace with recording option.